|
|
本帖最後由 coopermaa 於 2011-12-27 13:42 編輯
分享一下我最近寫的 mArduino Library:
https://github.com/coopermaa/mArduino
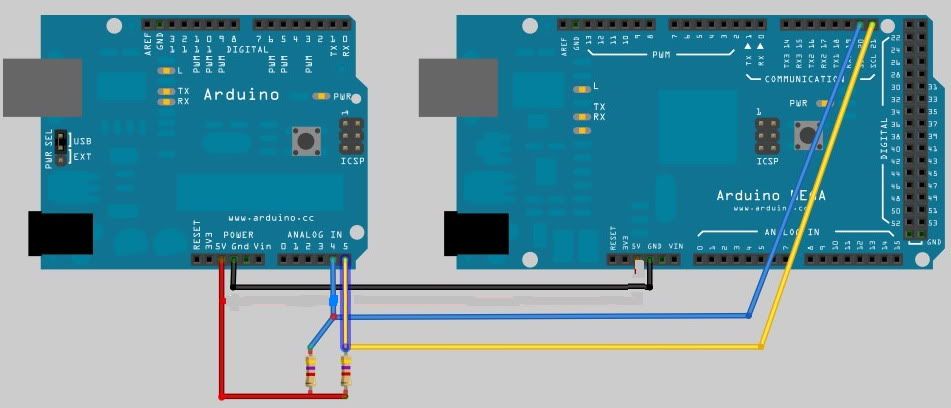
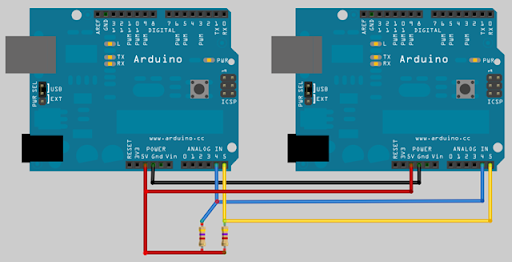
mArduino Library 可以讓你控制 I2C bus 上其它台 Arduino,做 pinMode(),
digitalRead(), digitalWrite(), analogRead(), analogWrite() 等動作
I2C bus 串接圖如下:
Slave 用這個程式,可以自行設定 address:
- // General_slave.ino
- // Refer to master examples for use with this
- #include <Wire.h> // You need to include both Wire.h and mArduino.h
- #include "mArduino.h"
- const int SLAVE_ADDRESS = 1;
- void setup()
- {
- mArduino(SLAVE_ADDRESS); // join I2C bus as a slave with address 1
- }
- void loop()
- {
- }
Master 範例::
- /*
- Blink - I2C master
- Turns on slave's LED on for one second, then off for one second, repeatedly.
- The slave is connected with master using I2C bus.
- */
- #include "Wire.h" // You need to include both Wire.h and mArduino.h
- #include "mArduino.h"
- const int SLAVE_ADDRESS = 1;
- const int ledPin = 13;
- void setup()
- {
- mArduino(); // join I2C bus as a Master
- pinMode(SLAVE_ADDRESS, ledPin, OUTPUT);
- }
- void loop() {
- digitalWrite(SLAVE_ADDRESS, ledPin, HIGH);
- delay(100);
- digitalWrite(SLAVE_ADDRESS, ledPin, LOW);
- delay(100);
- }
這支 Master 會控制 Slave 的 pin 13,做出 Blink 的效果。
程式的寫法跟 Arduino 原來的 API 幾乎是一致的,只是在呼叫 pinMode(), digitalWrite()
這些函式的時候多了一個 slave_address 的參數。
其它範例可以參考我部落格的說明:
http://coopermaa2nd.blogspot.com/2011/12/marduino-arduino-i2c.html |
|


 發表於 2011-12-27 13:40:14

 收藏
收藏 分享
分享 樓主
樓主